I saw a really cool homemade coffee table on Pinterest made from a palette. I liked the idea because it costs next to nothing to make and its so family friendly its ridiculous. No need for coasters, no worries about dings and dents because with a palette that’s all part of the look. So I asked the truck crew at work to save me a palette. Here’s what my palette looked like when I drug it home.

The first thing I did was to remove some of those slats. For the table I had in mind I didn’t need all those extra boards so I grabbed a hammer and got busy pulling out nails. Needless to say it was exhausting because the ends of the nails were hammered over and some of them were even twisted. getting them out was no easy feat!

Once I got my slats pulled out I hauled the monster into my garage and started the sanding process. The sanding process took a very long time because what started out as a “rustic table” turned into a masterpiece in my mind and I ended up sanding every single piece of wood. I also decided I was going to put a top and a bottom on my table so I needed to sand down both sides of that and the legs and the palette if it were to be soft to the touch. Lots and lots of sanding occurred and 1 shoulder was killed in the making of this table. Look at how soft the wood looks when it has been sanded. If you decide to try this project I highly recommend getting yourself a palm sander. Without it I probably would have abandoned this project.

Once I got all the wood sanded I gave my wood a vinegar bath. I used plain old white vinegar and a soft cotton cloth to wipe down the wood. The vinegar helps to remove any oils the wood picked up from contact with my skin or anything else that could leave residue behind. It also helps the stain to go on more evenly. The vinegar dries fairly quickly so within an hour or so I was able to start applying the stain. I used a dark walnut stain by Minwax. If you aren’t familiar with staining wood you can find some excellent videos from the Minwax experts on how to properly apply stain.

I decided to rub my wood out with a beeswax and olive oil combination. I know that some people will question that choice because typically the mixture of those two things will seal the wood but I felt it was important because it gave my wood a warmth and depth of color that I wouldn’t have gotten had I skipped this step. The act of rubbing down the wood and the moisture that comes from the beeswax-olive oil ointment makes the wood supple and gives it a warm glow.
Take note that I have not assembled any of the pieces of my table at this point. The whole thing was disjointed and sitting all over the garage in pieces. I did that on purpose. I find it is far easier and looks better to attend to each and every piece individually than it is to put it together and then do all the sanding and staining.
At this point I started sealing the wood with a water based rub-on polyurethane by Minwax. This product was amazing. It was thin so I was able to control the coverage. I applied the first coat a bit too thin. No problem, I did a light sanding which ended up making my finish even smoother, and applied a second coat. The second coat I applied considerably heavier than the first and when it dried I was ecstatic.

This was the time to assemble all my pieces. Like I mentioned earlier I added more to my table than just palettes. I wanted a flat top instead of the slats and I wanted a solid bottom so my table surface consisted of 3 parts; a top, a bottom and a palette. What I did to assemble my table was I bought a 4X4X8 chunk of wood and cut it into 11′ pieces – Of course I sanded and stained them when I did the other pieces – and mounted each of them to a piece of 6X6X1/2″ piece of wood by coating one end with liquid nails wood glue and then screwing the 6X6 down to the post. Once all 4 leg posts were mounted to a 6X6 I flipped my palette upside down and screwed my bottom piece to the palette. Then I screwed down my posts to my bottom piece. When I say that I mean I used 4 screws – 1 screw per corner, and screwed the 6X6 directly down to the bottom piece. Almost complete, I turn my table back upright. At this point it has no top Again, using liquid nails wood glue at each of the corners and along each cross plank I screwed the top to the palette.

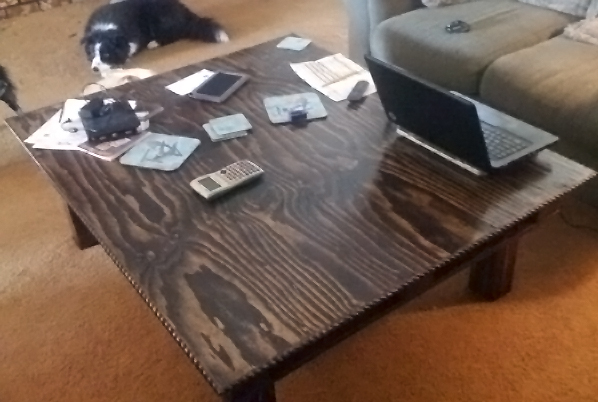
The final product. I’m pretty darn proud of it actually. It’s sturdy, it’s heavy, it’s massive and it’s beautiful.

To make a coffee table like mine here’s what you will need,
1 piece of plywood 1/2″ thick and 8′ long. Cut it into two pieces. One should be larger than the other. One will serve as the top and one as the bottom. The top piece should be 2 inches larger than you palette on all 4 sides. The bottom piece should be 1 inch smaller than the palette on all 4 sides.
1 junked palette
1 4X4X8 wood post to make legs
1 6X24X1/2″ piece of pine cut into 4 pieces each one being 6X6
Liquid Nails Wood Glue or other adhesive of your choice
220 grit sandpaper
Wood Stain (mine is dark walnut)
polyurethane
Sponge brushes to apply stain and polyurethane with
To make Beeswax and Olive Oil ointment
1 block of all natural beeswax (sold at Michael’s or store that sells all natural products)
Olive oil
To make:
Combine 1 cup of olive oil and 1/4 cup of shredded beeswax in a small pot.
Cook on low until beeswax is melted.
Let mixture sit and cool for a few hours stirring at least once per hour. When mixture is set it will be the consistency of butter. mix together one final time and then rub on wood surfaces with a soft cotton cloth.


This is certainly anything that everyone needs to do. It’s a fast
and simple method to make things straight forward.
Stop by my weblog; plans for garage storage
A palette coffee table is pretty economical and if you are skilled enough, you could have beautiful furniture at home or even the office.