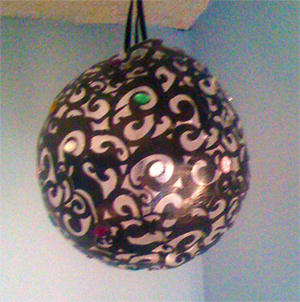
This DIY paper lantern was incredibly easy to make. The original idea came from someone on Pintrest and Facebook showing a paper lanternn made with cloth doilies. When I saw how cool it was I had to make one; the only problem was I don’t have any doilies. I’ve never really cared for doilies. They just aren’t my thing. So I got to wondering how I could accomplish the same thing with a different media and the lantern in the photo is what I ended up with. I was pretty pleased with it for my first attempt.
After making this lantern I got inspired and now I’m making several lanterns using several different mediums. Even my youngest daughter – who never wants to make anything wants to make one. She’s 17 and too cool for school so that’s sayin’ something.
This craft is so easy you can even get kids making these when they’re bored and looking for something different to do. I imagine these lanterns lining my patio or dangling from the roof at a party. I could literally go wild making all sorts of these things and I think it’s sort of addicting so if you’re into making stuff out of Mod Podge this craft is for you and here’s how you do it.
What You Need:
- Mod Podge
- 4 Sheets of Lace Scrapbooking Paper
- 1 Balloon
- A couple of Paintbrushes
- E600 Adhesive (you can get this at any craft store or hardware store)
- Various gems or beading enhancements
- A length of Ribbon
- 1 battery powered tealight candle
- Newspaper or craft paper to cover your surface while working


Instructions
- Blow up a balloon and tie it off.
- Attach ribbon or string to balloon and secure one end to the top of your table with tape or a weight. This makes the project easier to hold on to while you’re working on it.
- Drape a piece of the lace scrapbooking paper around the balloon. Notice how parts of it stick out when you try to mold it to the balloon. As a square piece of paper it will be a little hard to get it to conform. Scrapbooking paper is cardstock so its sturdy. Cut the paper into large shapes that will easily take the shape of the balloon. I cut my first piece into a large circle and wrapped it around the bottom of the ballon. Then I cut the other pieces into large strips and wrapped horizontally around the balloon, making sure to overlap all the edges. Then I cut another set of strips much smaller to fit around the top of the balloon where it gets smaller again. I made sure to leave a hole in the top large enough for my hand to fit through and put the light inside.

- Coat the back of all of your paper pieces with Mod Podge using the paintbrush.
- Wrap the large circle around the bottom of the balloon and liberally paint Mod Podge over the top of it so that the paper is soaked.
- Put the rest of your lace scrapbooking paper pieces on the balloon in the same fashion making sure to overlap edges and paint over the top with Mod Podge.
- Allow the paper to completely dry by letting it dangle from the ribbon or string we anchored it with earlier. This is where it can get tricky. if the temperature of the room gets to hot the balloon will deflate and take the lace paper with it. If the temperature gets too cold it can pop and you lose your lantern. Try to keep the room at a level temperature. This could take a couple of hours.
- Once the balloon is dry, give it another really good liberal painting of Mod Podge. Don’t be stingy on the Mod Podge. it will dry and all the white stuff will turn clear. Just don’t be tempted to play with it in this stage. Don’t try to peel the paper off the balloon or anything. Go watch a movie or something.
- Once this second coat is dry you are ready to pop the balloon. Don’t have a heart attack when it implodes. Gather the kids around to watch, it’s kinda cool. It will fold in on itself and if you did everything right the balloon will pop to the top and the lantern will pop back into shape and it will be a hollow empty bowl.
- All the clear spots between the lace “holes” will be like a clear plastic. Poke a hold on four sides around the top hole and thread a length of ribbon through it, tie together in the center and hang from the rest of the ribbon length.
- Use E600 and add gems or other embellishments to your lantern and allow to sit for about half an hour or so.
- Drop in battery operated tea light, hang, turn out the lights and enjoy.

Quick notes
I find that it is easier to work on these if they are filled with helium because they float instead of bob around. The only problem is that it’s even harder than normal to keep the balloon from popping or deflating in the middle of the night.
I also found it a good idea to wear latex gloves because that’s alot of Mod Podge on your hands. :lol


Oh it does indeed work. It’s a blast to do. I made one completely covered in paper scrapbooking flowers. It sort of reminds of a floral swimming cap from the ’70’s. LOL
Oh, and congratulations on the wedding!
LOVE your tutorial! I saw the lace doilies ones on pinterest also and was inspired to make these for my wedding, instead of the plain boring paper lanterns. I conceded to having to use paper doilies (because crocheted ones are so expensive) but was not sure that it would work well. Your tutorial showed me how to properly do this, and that it will work! Crafting time!